Monthly Archives: June 2012

Pizza Popcorn Changes the Game

Standard

When I first pinned this recipe for Pizza Popcorn from All Recipes, it made me think of my trip to NYC with my sweet Grandma.  Because I’m extremely anxious at the airport, I always arrive way too early, anticipating that TSA will have security backed up like Top Thrill Dragster at Cedar Point (which is actually worth the wait, so if you get the chance to ride it, DO IT), and I usually end up with a bit of time to wander around the airport.  Usually I pick up a few Sugar Free Red Bulls (because obviously an energy rush does wonders for pre flight jitters…) and maybe some almonds, which costs about $35… ok not that much, but way more than what I’d pay “on the outside” (Have you ever seen Jerry Seinfeld’s act where he talks about the airport (check out what he says at 2 mins, 20 seconds)?  Too funny!).  But Delta’s terminal at LaGuardia… Seriously lacking in Sugar Free Red Bull.  And, to add insult to injury, there are no Pepsi products to be had, so a girl couldn’t even get a Diet Pepsi.

Which left me only one viable option.

Alcohol.

Now, I’m not a big drinker, mainly because I don’t like the taste… and I’m a light weight… and I only drink sugar free or diet drinks to mix my alcohol in.  So, since I mentioned before that I had a lack of choices in the beverage department, I grabbed a Diet Sprint from a store front, and had the bartender pour me a big old glass of Stoli (for $9.00), and bring me an empty glass and a few packets of splenda, so that I could mix up my own drinks.  Diet Sprint, Vodka, and a packet of splenda.  It’s actually not bad, as it sort of reminds me of a Vodka Collins.  And it’s low carb, which is always a bonus for me.

While I was (mixing my own drink) at the bar, a man sat down next to me, and ordered some pizza popcorn.  I didn’t think much of it until it arrived at the table.

And then the smell wafted over to me… so I ordered some, too.

And while that man next to me had some leftover in his bowl an hour later when I got up to get to my gate, my bowl had long since been emptied.  I even told my husband and Christopher about this miracle creation when I got home, as I summarized the many trip highlights.

Now, I love popcorn.  And I generally like it served with only butter and salt.  That’s it.  No chocolate, so white cheddar, no seasoned salt, just plain salt and butter.  But I made an exception for this stuff.  I LOVED pizza popcorn.

And, as luck would have it, I found the recipe.  And unlike at the airport, it won’t cost you $9.50 to make it.  Promise.

Here’s what All Recipes says you’ll need:

  • 2 1/2 quarts popped popcorn
  • 1/3 cup butter
  • 1/4 cup grated Parmesan cheese
  • 1/2 teaspoon garlic salt
  • 1/2 teaspoon dried oregano
  • 1/2 teaspoon dried basil
  • 1/4 teaspoon onion powder
  • 1/4 teaspoon salt

Start by preheating your oven to 350, and air popping yourself some popcorn.  Or make it in the microwave, using a paper bag.  That’s what I did.

Then you combine the melted butter with the parmesan cheese, garlic salt, regular salt, onion powder, basil, and oregano.

This is where I diverted from instruction in the source recipe.  I dumped all of my popcorn into a (obviously new and clean, and otherwise empty) kitchen trash bag, poured my butter and combined spices in with it (I let the melted butter cool down a bit before doing this… a melted plastic bag would mean a BIG mess, so I suggest you do the same), twisted the end of the bag to hold it shut, and shoot everything up to combine it really well.  This yummy spice and butter combination needs to be on every single kernel, trust me, and this method works well.  It’s how I make monkey munch, (aka holiday snack mix) too.

After shaking everything up, put it into an ungreased 13x9x2 baking dish, and bake on 350 for about 15 minutes on the center rack. But be careful, and keep an eye on it, as some of the reviews reported that their popcorn burnt before the 15 minutes.  Mine did not, but you never know, and there are few smells worse than burnt popcorn, so be sure to check on it from time to time.

When you’re done, it will smell amazing.  It will look like regular popcorn…  you almost can’t see the seasoning that is going to make your taste buds beg for more.

But when you taste it… OMG…

I ate it all in about 20 minutes.

Yeah, baby.  I’m ecstatic to report that it tastes exactly like the pizza popcorn at LaGuardia.  Except you don’t have to be in the airport, carting around your carry on luggage, praying that your flight leaves on time.

It’s perfect for a snack spread at poker night, or at any casual get together.  The next time that you have a taste for a snack, give this a try.  Then come back and tell me how you liked it!!

Red, White, and Blue-tiful!

Standard

While visiting Hobby Lobby last week, I noticed that tulle, in all sorts of colors, was on sale for 77 cents per yard.  Normally, it’s pretty cheap, but bright signs reading “Sale” really draw my attention, so I knew I had to have some.  The question however, was, what colors did I want, and what was I going to make?

Enter my transition to the “smart phone”.

Yes, go ahead and snicker.  I just now, within the past six weeks, have upgraded to a fancy phone.  Boy was I resistant, too.  I am not one of those people who learn how to use electronics very quickly, plus, I have deficient fingers when it comes to controlling a touch screen.  Whenever I try to use my husband’s Droid, I end up getting frustrated and giving up.   I was holding tightly to my old “dumb” phone, and was quite happy with it.

But, when I went to New York, my husband insisted that a smart phone would be useful (and he was right, natch).  I picked an iphone, since I love my Macbook and have an ipod touch somewhere in the bottom of my purse– or maybe it’s in my glove box, who knows–, and I figured that a little brand loyalty would make it a more seamless transition to the new device.  I’m happy to report that I am able to make calls on my new phone, and while I don’t use it, or poor neglected Siri, for even a fraction of their capabilities, I did manage to find the Pinterest App.  Thanks to that stroke of luck, I was able to pull up my boards, right there in the fabric section, and decide on my colors.

I quickly decided to make a wreath, to decorate our door in honor of the next holiday on deck, Independence Day.  And talk about some cute inspiration wreaths, there are so many great ones for Independence Day.  Plus, with red, white and blue, you can also hang it around Memorial Day, 9-11, Veterans Day, D-Day, or any other time you want to be patriotic– and being patriotic never goes out of season.

I found three really great red, white, and blue wreaths as inspiration.  First, there was this one made of felt stars from Naptime Crafting.  (BTW, isn’t that a great blog name?  I can totally relate to capitalizing on the craft possibilities of nap time.)

Then there’s this one made with pinned felt squares from Sky, at Capital B.

Source: Capital B

And then this yarn wrapped version from Jamie at The Creative Imperative.

The theme being obviously flag based,  it was definitely amenable to using tied tulle, rather than felt, yard, or other mediums. Plus, tied tulle takes less time than yarn wrapping, or cutting and pinning/gluing felt.

I stocked up on 3 yards of white (figuring it would be thinner, and I’d need to layer more of it to keep it from being transparent), 2 yards of red, and 2 yards of blue.  I probably could have gotten by with 1.5 yards of red, but I had no way of knowing that until I came home, and at 77 cents a yard, a little leftover isn’t such a big deal.  I also picked up a 12 inch wreath form– your finished wreath will be larger because of the fluffy nature of the tulle; My finished product is 19.5 inches in diameter–, a firework themed ribbon, and a $3 package of sticky mirrored stars.  Grand total– using a 40% off coupon for the wreath form– $16 plus tax.  Not too shabby.

I started by folding the yarn in half lengthwise, and cutting it into strips about 4 inches wide (I didn’t measure, I just eyeballed it, and focused more on getting the cuts reasonably straight.  The tulle bunches when you tie it, making this a really forgiving project).  That gave me a stack of strips about 26 inches long by 4 inches wide.

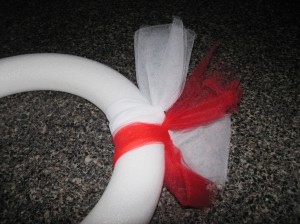
Then I folded those strips in half (making them about 13 inches long, and started to tie the folded strips around the wreath form.

I mentioned that the tulle bunches up when you tie it, which ends up making each of your bands about 2 inches wide.   I then alternated tying white and red strips.

I did this until about 3/4 of the wreath form was covered, and then I started tying on blue strips.

I covered the rest of the wreath in blue tulle, and then tied a strip of ribbon around the form in a simple knot, covering it up by angling two strips of the blue tulle, so that you can’t see it other than the portion that is used for hanging the wreath. Like I said, this is a forgiving project.  Then I placed some mirrored stars on the blue portion, and hot glued them.  Their own adhesive was meant for simple paper, it wasn’t going to be able to permanently adhere to tulle.

I originally thought about doing stars all over, but when I placed them, I thought it was overkill, and that it made the design less reminiscent of an American Flag, so I ultimately only glued stars on the blue portion.  What do you think?

I hung it on the door, and it immediately got approval from the neighborhood kids.  Nothing like a bunch of elementary aged girls oohing and ahhing at your creation to boost your crafting self esteem.

The whole project took about 2 hours, and the bulk of that was cutting the strips of tulle.  Honestly, once you get that out of the way, it’s a piece of cake.

And it’s pretty festive looking, even from the driveway.  I just love a wreath on the door, it makes me smile whenever I drive in.

What about you? Anything exciting going on at your home lately?  Or at work?  Or in your imagination?  Big plans for Independence Day cookouts or travels?

Another Swing of the Magic Wand

Standard

I teased you earlier this week when I told you that I had learned another use for vinegar.  I’m telling you, the stuff is a must have for any household.

My newest reason for loving vinegar is that I took my boys, including our nephew, berry picking.   Christopher has been berry picking many times.  Even his Majesty went a few times last year (although he didn’t so much PICK berries, as much as he did EAT berries).  However, unbeknownst to me, my nephew, who physically lives–and has grown up in– the middle of farm land in the midwest, has never gone berry picking.  Furthermore, he has a limited understanding that food comes from farms… a fact which actually rendered me momentarily speechless.

Have no fear, we’re breaking him in.  And taking him berry picking for the first time was even more fun than it would have been on an ordinary visit.

Except for one thing…

We picked a lot of berries..

8 pounds of strawberries and 2 lbs of blackberries to be exact.  They were having so much fun, and were so intent on picking “good” berries, that I didn’t have the heart to tell them to stop…

That is, until it dawned on me that I only had $31 in small bills, and that unless the farm could change a large bill on a day when we were the only people there picking produce, we were going to have to perform some manual labor if I didn’t put an end to things soon.

So, 10 lbs and $28 worth of berries later, we headed home, the kids with purple and red fingers, and myself wondering how we were going to keep all of these berries in edible condition long enough to polish them all off.

And then, I remembered this pin, which links to a great blog post by FoodLush, about how to use a vinegar rinse to keep berries from molding. It was really quite simple.

Combine 1 part vinegar to 10 parts water in a bowl or in your sink.  I did 1/2 cup vinegar and 5 cups water.  Then add your berries, a little at a time, and gently swish them around.

I did less blackberries at a time, because they’re more delicate than strawberries, and I didn’t want to damage them when I was swirling them around in their vinegar bath.  I changed the water out after every few batches.

After you dip them in vinegar, drain them, and  put them in the fridge.  You can rinse them with plain water afterwards, but I tasted them directly from the vinegar bath and didn’t notice a taste difference, so you don’t have to.

Or just start eating them.  Preferably with homemade whipped cream, made in 2 minutes in your “OMG-howdidIeverlivewithoutyou” Kitchen Aid Mixer.

I can’t speak for the blackberries, as we ate those the same day that we picked them, but I can tell you that 5 days later, the strawberries that were left were still nice and firm and perfectly delicious in homemade strawberry ice cream.  Ooh baby! Summer is here!

So yeah, like I said.  Vinegar is magic.  Why don’t you give it a try?

Vinegar is Better than a Magic Wand

Standard

I love having a clean home.  One of my favorite things to do in the morning is come down the stairs and take in the sight of  my lovely, clean, home before my children wake up and take the opportunity to redecorate it with their toys and shoes and books.

But the chemicals commonly used for cleaning freak me out.  Even with gloves on, the fumes make me nervous.  Luckily for me, a friend introduced me to cleaning with vinegar a few years ago, and I’ve been sold ever since.  I use it to wipe down counters, sinks, windows (mix it with water and a few drops of old fashioned blue dawn dish soap, and it will keep it from streaking), woodwork, you name it.  I still clean with the heavy stuff, too, but my every day cleaning, for the most part, is done with vinegar.

Over the years, though, I’ve been enlightened to the many used for vinegar outside of cleaning.  You can put it in your pets drinking water to help their coat shine.  You can use it to ease the pain out of wasps and jellyfish stings (but not bee stings, use baking soda for that), and to sooth a sunburn.  It is a good deodorizer for trash cans and diaper pails.  It is a good hair conditioner, and skin toner.  It is an excellent disinfectant for cutting boards and dishes.  Remember that movie, My Big Fat Greek Wedding, where the father keeps telling everyone to use Windex to cure all of their aches and pains?  I am getting pretty close to telling everyone to put use vinegar to cure their problems in every realm.  And if it doesn’t work, no love lost, because it’s about $3 a gallon.  No joke.

It seems that I’m always learning new ways to use vinegar, and this month was no exception.  Our ten year old nephew has been staying with us for a few weeks, and he’s not accustomed to removing his shoes when he comes in from playing.  He’s getting better about it, but for a week or so, my carpet got more shoe traffic than it has in the entire time we’ve lived here.  Thankfully, I remembered this pin, about using a vinegar solution to clean stains from carpets (even old, set in stains).  I took photos of my carpet, but you can’t really appreciate the spots in the pictures, so trust me, they were there.  Just dusky, dirty little spots from shoe tread.  Enough to drive me crazy, though.

The source blog, Lizzie Writes, spilled an entire bottle of salad dressing on her carpet, and this is what she used to clean her carpet.   Her results were so amazing, be sure to check them out.

So, I got to work with this magic carpet cleaning regimen.  All you need to do is sprinkle your stains with baking soda or corn starch, and let it set for a few minutes (If you are treating a new stain, blog up what you can first with a white cloth; I used a clean cloth diaper pre-fold, which is another awesome thing to have around the house).   I just poured the baking soda and rubbed it into the carpet, hoping to absorb any oils in the stains.

While you are letting that set on your stain, you can get to work mixing vinegar, original blue dawn dish soap, and water (my favorite multipurpose solution, by the way).

I keep this solution in a spray bottle lying around the house, but the concentration mentioned in the source blog was rather specific, so I mixed a new batch just for this.  You’ll mix 2 cups warm water, 1 tablespoon Dawn, and 1 tablespoon white vinegar.

I just mixed mine in a regular old kitchen bowl.  It’s nontoxic, so no worries.

I then vacuumed up the baking soda, and marked the concerning areas with glass beads (because that’s what I had handy).  That helped me to remember what areas I needed to treat, since they weren’t glaringly obvious.

Then I dipped a white cloth (diaper) in the vinegar/soap mixture, and applied the solution to the stained areas, blotting up all of the excess liquid with a dry cloth. Then I covered them with another dry white cloth, so that no one (the cat) would step on it overnight, and I went to bed.

The next morning, I assessed the dry carpet, and I gotta tell you, this simple solution really does work.  I’d post a picture, but you won’t be able to tell the difference in it, but I promise you, it was magical. I poured the leftover solution from the bowl into a generic plastic bottle, and put it with my cleaning solutions to have on hand in the future.

And I needed it within the week, when my (grown up) little brother passed out bowls of blackberry cobbler to the kids in the living room (shame, shame; he doesn’t have children yet, but one day, he’ll learn), and the morning after he left, I noticed a dime sized purple stain on the cream carpeting.

I wish I’d taken a photo, but I panicked and went straight for my magic solution, not expecting much, but still, ever hopeful.  I even skipped the baking soda step, and just doused it in the solution, and it erased all hints of that cobbler with very little elbow grease at all.

So if you have a hopeless looking stain on your carpet, give this solution a try.  The ingredients are cheap, you may even have them in your house already, and you won’t have to worry about your kids playing on the floor while it’s drying because it’s nontoxic.

And that’s not all I’ve learned about vinegar this month!  Stay tuned! But in the meantime, do you have a natural cleaning tip that you can pass along?